Monday, 29 April 2013

Simple Sympathy

Good morning!
 To say I was working this weekend, I still managed to get a surprising amount of crafting done! So here is one of the cards I made...


I have used to flowers from Marry Me and stamped them 3 times in Certainly Celery, Blushing Bride and Pretty In Pink. The embossing folder is Fancy Fan and the design paper is from the Twitterpated set...gorgeous! I finished with my sentiment from Petite Pairs, some Daffodil Delight Taffeta Ribbon and a couple of pearls.

Supplies
Cardstock - Whisper White
Designer Series Paper - Twitterpated
Embossing - Fancy Fan
Stamps - Marry Me, Petite Pairs
Inks (Markers) - Blushing Bride, Certainly Celery, Pretty In Pink
Ribbon - Taffeta Ribbon

If you would like to order any of the beautiful Stampin' Up! items, please do contact me
SPECIAL OFFER!! Order £250 of products and choose £65 worth of products FREE! Or join Stampin' Up! and choose £155 of goodies for only £99!! Contact me or see here for more details!


Challenges

Thanks for popping by today...come by again tomorrow and see a couple of cards I've made using a new technique! :)

Sunday, 28 April 2013

Zesty Birthday!

Good morning!
Here is one of the cards I made yesterday after it started raining whilst I was trying to plant some seeds....don't think I'm ever going to grow anything this year! :/


I have very simply made a 1cm thick frame out of Crumb Cake, coloured the Stacks of Wishes Hostess stamp in Lucky Limeade, Melon Mambo and Pumpkin Pie, and finished with a triplet of nail gems. A very sweet and simple card...great to have in the stash, just in case!

Supplies
Cardstock - Whisper White, Crumb Cake
Stamp - Stacks Of Wishes (hostess)
Inks (markers) - Lucky Limeade, Melon Mambo, Pumpkin Pie

If you would like to order any of these gorgeous items please do contact me!
I'm working today so I'm off now...see you tomorrow!


Saturday, 27 April 2013

Less Is More - Sketch

Good Morning!
I have to do this super quick this morning as I have to be in work at 9am! We're in our new shop now and we open half an hour earlier!

So this week at Less Is More, it's time for a sketch. So here is my card...


For this very simple card I stamped my flower from Love and Sympathy in certainly Celery and Blushing Bride (one of the new colours!) The sentiment is from Teeny Tiny Sentiments and is stamped in Old Olive and punched out with Word Window, then mounted onto Elegant Label. I paper pierced the edges of the panel with the Paper Piercing Essentials Pack, and finished with the ribbon which I trimmed to the white thread, leaving it stick out for a bit of interest. 

Here is the sketch...


Supplies
Cardstock - Crumb Cake
Stamps - Love & Sympathy, Teeny Tiny Sentiments
Ink - Blushing Bride, Old Olive,
Punches - Elegant Label, Word Window
Ribbon - Stitched Grossgrain
Other - Paper Piercing Essentials Pack

If you would like to order any of these gorgeous items please do contact me...I'm here to help! :)

I had better dash now...enjoy your Saturday, whatever you're doing! :)


Sketch Saturday #256 with Stamp Fairy

Good morning everyone!
I hope you've all had a good week!

We have our new challenge at Sketch Saturday and here is my card...


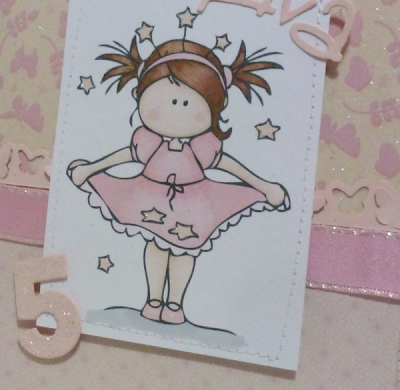
I have used Mimi Stars from our fab sponsor this week, and coloured her with Promarkers. The papers and ribbon are some from my stash. The butterfly border is Martha Stewart and the letters are Sizzix Catty Corner.


The number is Die-Namics.

Here is our sketch...


I look forward to catching up with you all this week! :)


Wednesday, 24 April 2013

A new flower!

Good morning!
Ok so those of you that know me know that I love my die cuts like the Secret Garden bundle and the Papillon Pot Pourri Butterflies, and the All Dressed Up Bundle right? Well I have a new toy! It's the Blossom Party Originals die, and I LOVE it!!

Here is a card I have made using it...

The extra flower is just a little gift I have popped into my Stampers 6 parcels this month. I have used the very yummy Raspberry Ripple for the card and Regal Rose for the extra flower. I finished each with some very sparkly Dazzling Details Silver Sparkle.


The feathers are from my stash.

Supplies
Cardstock - Whisper White, Raspberry Ripple
Designer Series Paper - Brights
Sentiment - Teeny Tiny Sentiments
Ink - Basic Gray
Other - Dazzling Details Silver Sparkle

If you would like to order any gorgeous Stampin' Up! products please do get in touch :)

Challenges
Addicted To CAS - Flower
SUO Challenges - Anything Sizzix!

It's Keiran's 5th birthday today, so we're out for tea later...Pizza Hut (his choice!) So hopefully, I will get chance to make a card later for tomorrow!


Tuesday, 23 April 2013

Stamped Word Card Tutorial

Helllooo!
As promised, I have the tutorial here for the 'Thanks' card I entered into the Less Is More - Case it! challenge earlier this week. It is slightly trickier that the usual way that works for thin, single letter dies, as I have used a Bigz die, but it works and has a wonderful effect on your cards!

Ok, so you will need;

1 x DL card blank
Elements of Style stamp set
Stampin' Write Markers in Midnight Muse, Summer Starfruit and Gumball Green
Black inkpad
Bigz Alphabet Typeset letters
Stampin' Dimensionals
Pencil, ruler and rubber
and most importantly, Stamp-a-Majig!

fig 1. 
Cut out your chosen letters with your Bigshot

fig 2. 
Stamp your image in black ink onto your Stamp-a-Majig

fig 3. 
Ink up your stamp, picking out different areas with different colours

fig 4. 
Line up your Stamp-a-Majig to position your image on the card blank and then stamp your coloured image. 
*TIP* if your stamp appears to have dried a little before stamping, just 'huff' on it to re-activate the ink...it's water based so this works brilliantly!

fig 5.
Draw a line in pencil very softly across the card, for your letters to sit on to ensure they will be straight!

fig 6.
Re-align your Stamp-a-Majig image over the image on your card blank, making sure it is perfectly aligned. Tape down gently if you wish, remembering to use low tack tape! Then place your letters along the line you drew that you can see through the acetate stamped image. Again, use a little low tack or re-positional adhesive on the back of the letters if you wish to ensure they don't move.
*TIP*  If you position the letters just slightly above your pencil line it will make it easier to rub out later!

fig 7.
Now line up the Stamp-a-Majig 'arm' with the acetate.

fig 8.
Re-ink your stamp, then stamp onto the letters using the Stamp-a-Majig to guide you.

fig 9.
Carefully remove the stamp and allow letters to dry before removing the Stamp-a-Majig arm. 

fig 10.
You can then remove the letters and position them over your stamped image on the card blank, using Dimensionals to pop them up! Don't forget to rub out your pencil line too!
Et voila!! One beautiful and elegant card!!


 I really hope you have found this useful, and easy to follow. It may seem like a lot of work, but it's not really, honest! I would so love to see your version, if you give it a go so please do leave a link to your creation in the comments and I promise to come see! And don't forget to enter it into this week's Less Is More challenge too! :)

 If you would like to order any of the Stampin' Up items I have used here, please don't hesitate to contact me...I am always happy to help! 

I am entering this into SUO Challenges - Anything Sizzix!
Enjoy playing! :)


Monday, 22 April 2013

Simply One Layer

Good morning!
I have a very simple, quick and easy one layer card for you today...


One card blank, one stamp set, two inks...done!


The embossing was done using an old square die and a crease pad on the Bigshot.

Supplies
Cardstock - Whisper White
Stamps - Feeling Sentimental (SAB)
Inks - Basic Black, Basic Gray

If you would like to order Stampin' Up! goodies and earn yourself free items please do contact me!

Challenges

I have an exciting day in our new shop today. We are moving into our new shop so it'll be almost like starting a new job! I'm sure it'll be very busy with people coming to check us out!

Hope you have a fab day!
See you tomorrow!


Sunday, 21 April 2013

Less Is More - CASE #2

Good afternoon!
I have another card here for the Less Is More - CASE It! challenges, and this time I have CASEd Jen's gorgeous card!

This is my card...


I have used the Vintage Verses set from SAB stamped in Versamark and embossed in Pool Party EP...isn't it gorgeous?? The paper is from the Neutrals Designer Series Papers, and the ribbon is Pool Party Ruffled Ribbon.

This is Jen's lovely card that I CASEd...

Supplies
Cardstock - Pool Party, Crumb Cake
Designer Series Paper - Neutrals
Ink - Versamark
Stamps - Vintage Verses
Embossing Powder - Pool Party
Ribbon - Pool Party Ruffled Edge
Framelits - Labels Collection

If you would like to order any gorgeous Stampin' Up! goodies please do contact me...I would be delighted to place an order for you!

Challenges

Yesterday was a fun day...Keiran had a really good day at his party, then we went to the park, then home for a bbq... all in all a really great day!

Here are a couple of photos of my little Superman...


With his cake...

His homemade party favours using the Milk Carton Die...

Keiran's own colouring...

Off to Jen's for tea now...see you tomorrow! :)


Saturday, 20 April 2013

Less Is More - Case it!

Good morning LIMettes! I have to be quick this morning as it's Keiran's Birthday party today so lots to do!

This week at Less Is More, Chrissie and Jen are asking us to Case one of their cards!

Now, Jen's card looks like the easier option, but I thought I would have a go at Chrissie's one instead as it's a technique I've been meaning to try for a while!

Here is my card...


I have used the Elements of Style stamp set and the Alphabet Typeset Bigz Dies. 

Here is Chrissie's card that I have Cased


I'm also entering my card into the colour challenge at Create with Connie and Mary
2013 Thursday Challenges-011
CASology - Word
Shopping Our Stash - Text or Letters
Just Add Ink - New Technique

EDIT; The tutorial for this technique is now available here...Enjoy! :)


Sketch Saturday - #255


Good morning Sketchers!
Here is my card for our new challenge at Sketch Saturday...


I have used Belle from Sassy Studios and coloured her with Promarkers and finished with glitter. The papers are old ones from my stash.


Here is our sketch...

And our fab sponsor is...


I have to go get my little man ready for his 5th Birthday party now! Wish me luck lol!


My most popular posts